Unity Scriptable Rendering Pipeline DevLog #1: Initial Setup

Tutorial / 16 June 2022

Hi and welcome to Decompiled Art articles!

Thought this series of blogposts we'll create mobile-oriented rendering pipeline based on Unity's built-in Scriptable Rendering Pipeline API. 

Ill try to make it simple and practical so you can implement and extend provided code & its features for your project needs. Thanks so much, hope it'll be a fun journey, let's s begin.

First things first, what is Scriptable Rendering Pipeline (SRP for short) and why you should (at least) consider using it? 

Rendering Pipeline at its origin (not only within Unity) is a set of rules to determine what has to be rendered and what set of features should be applied to render a single frame. There are lots of possible render features could be applied, but to name a few and for you to better understand, here're some examples: lights, shadows, opaque/transparent shadings, post-processing, etc. 

More information on what SRP is & what it does from Unity:

https://unity.com/srp

https://docs.unity3d.com/Manual/ScriptableRenderPipeline.html


Project setup

Open Unity Hub and create new project with selected template: 3D Core. For this series I'll be using Unity 2021.3.3f1. 

We will not be configuring and explore existing SRP templates (URR, HDRP) but rather will build our own from the ground up

Next, depending on your project needs, create a new scene. Then create several objects with different shading features. We'll start pretty simple. I've created four materials (2 per lit and unlit shading)


Next we need to create a new RenderPipelineAsset. This asset behaves like main entrance point to determine how rendering should be configured for your project. It's also used to store various settings as interactive controls for Render Pipeline stages.

using UnityEngine;
using UnityEngine.Rendering;


[CreateAssetMenu(menuName = "Rendering/RP/CustomRPAsset")]
public class CustomRPAsset : RenderPipelineAsset
{
    protected override RenderPipeline CreatePipeline()
    {
        return null;
    }
}


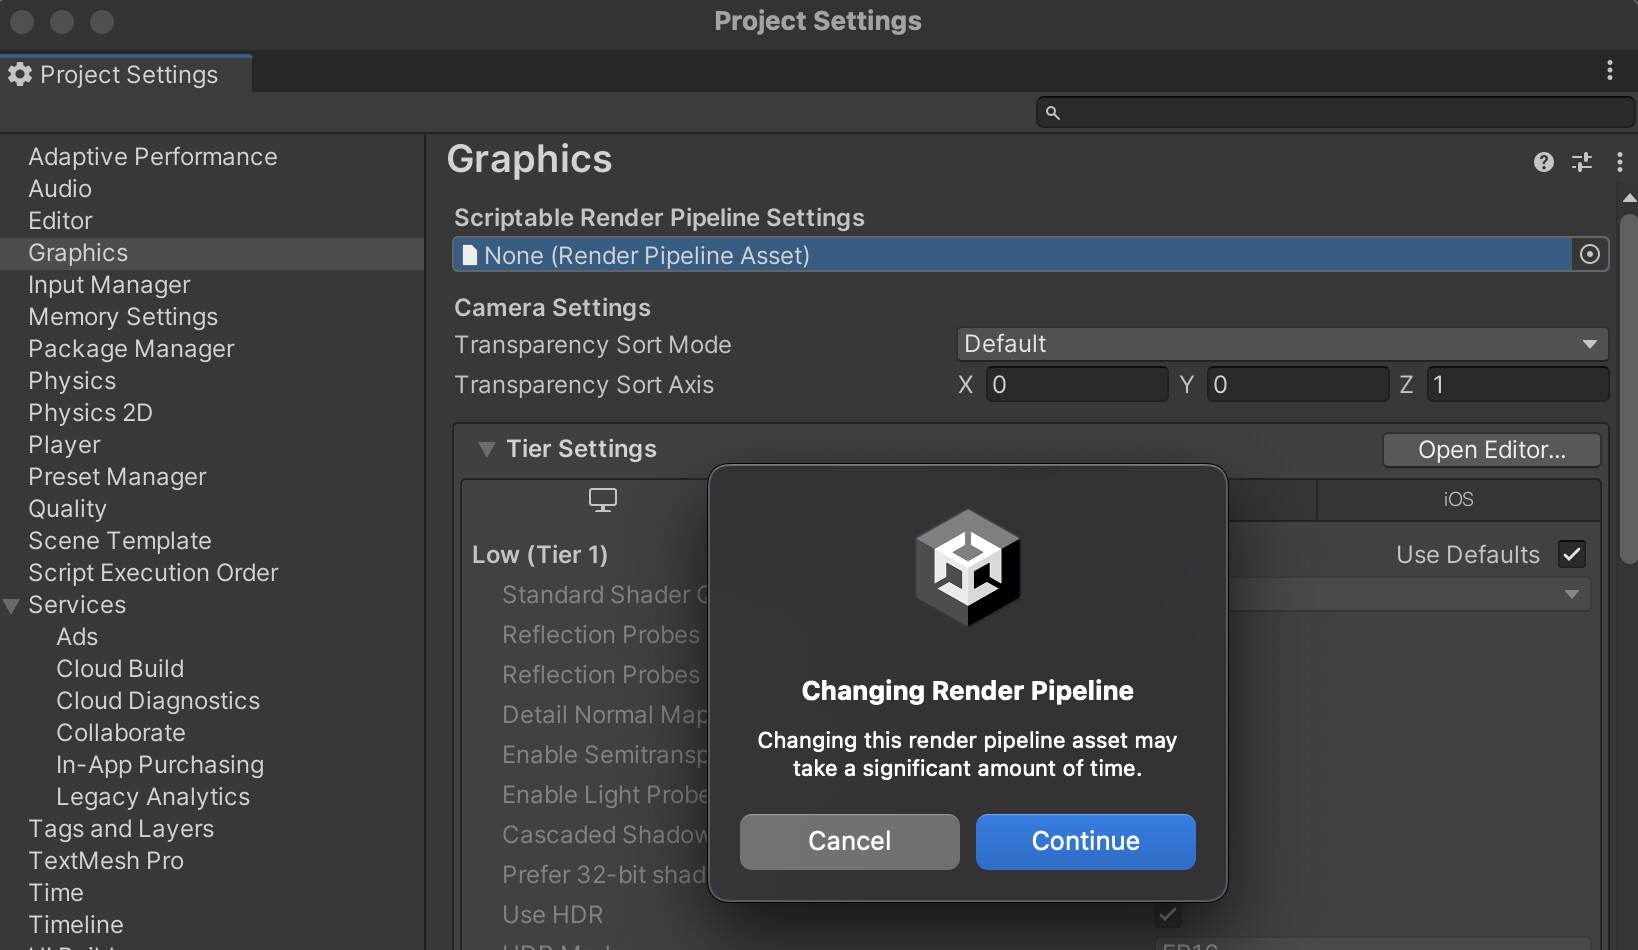
To check that everything is working properly, create new RenderPipelineAsset and assign it as project's RenderPipelineAsset. 

Confirm changing Render Pipeline.

Once you assigned RenderPipelineAsset to Scriptable Render Pipeline Settings field, you should check are there any errors. If not, you'll end up with just blank black. 

That's totally fine cause we have nothing specified to configure our own Render Pipeline. 

Next step is to create RenderPipeline script itself. Create new C# script...

using UnityEngine;
using UnityEngine.Rendering;


public class CustomRP : RenderPipeline
{
    protected override void Render(ScriptableRenderContext context, Camera[] cameras)
    {       
    }
}
Rather than returning null (within out custom RenderPipelineAsset) we now can return newly added RenderPipeline. 
using UnityEngine;
using UnityEngine.Rendering;


[CreateAssetMenu(menuName = "Rendering/RP/CustomRPAsset")]
public class CustomRPAsset : RenderPipelineAsset
{
    protected override RenderPipeline CreatePipeline()
    {
        return new CustomRP();
    }
}

A good practice is also to have a dedicated control over each camera rather than rendering all existing once with same RenderPipeline properties. To do that we need to create a new class for Custom Camera Renderer. 

using UnityEngine;
using UnityEngine.Rendering;


public class CustomCameraRenderer
{
    private ScriptableRenderContext _context;
    private Camera _camera;


    public void Render(ScriptableRenderContext context, Camera camera)
    {
        _context = context;
        _camera = camera;
    }
}

Now (within CustomRP Rendering Pipeline) we can iterate through each available camera by providing existing context and cameras array to public Render() method created earlier. Don't forget to create an instance of custom Camera Renderer. 

using UnityEngine;
using UnityEngine.Rendering;


public class CustomRP : RenderPipeline
{
    private CustomCameraRenderer _renderer = new CustomCameraRenderer();
   
    protected override void Render(ScriptableRenderContext context, Camera[] cameras)
    {
        foreach (var camera in cameras)
        {
            _renderer.Render(context, camera);
 }
    }
}


At this point you should have three scripts that are responsible for creating CameraRenderer, RenderPipeline and RenderPipelineAsset. 

Also, you can dock FrameDebugger and take a look at its stats. Our pipeline is working... but nothing happens. 

You're good to go and have everything set up for implementing your RenderPipeline features. Which we'll do in the next chapter. 

Hope you've enjoyed with provided info and thanks a lot! Stay tuned!


Support Decompiled Art on Patreon


Support Decompiled Art with Ko-fi


***

FOLLOW AND CHECK FOR UPDATES:

Decompiled Art YouTube

Decompiled Art Instagram

Decompiled Art Twitter

Decompiled Art Facebook

***

...Game Art decompilation has begun...

Decompiled Art - Technical Art Digest #03

Tutorial / 14 September 2020

Technical Art Digest №03 is here! 

***

Inspiring GameDev creations, tutorials, shaders breakdown and VFX techniques from industry masters await!

https://artstation.com/marketplace/p/bK6k/decompiled-art-technical-art-digest-03


It's COMPLETELY FREE so I highly recommend to check it out!

Thanks for your time and stay safe!


FOLLOW AND CHECK FOR UPDATES:

Decompiled Art YouTubehttps://www.youtube.com/channel/UCWpi3cjQytYYcpF5btqIblg

Decompiled Art Instagramhttps://www.instagram.com/decompiled_art/

Decompiled Art Twitterhttps://twitter.com/fridrian 

Decompiled Art Facebook: https://www.facebook.com/decompiled_art-101251988226944


***

...Game Art decompilation has begun...


ImageEffects 101 in Unity: Contrast, Brightness, Vignette, 1D LUT

Tutorial / 21 August 2020

Hi everyone! In this post we'll take look at the basic setup for working with image effects, brightness and contrast adjustment, implementation of Vignette effect and 1D LUT Color Grading in Unity. 

Final result

***


Step 0: Preparation – Basic PostProcess script, Shader, Material

***

Basic C# PostProcess script code 

using UnityEngine;


[ExecuteInEditMode]
public class PostProcess : MonoBehaviour
{
    public Material CameraMainPostProcessMat;
    
    public void OnRenderImage(RenderTexture src, RenderTexture dest)
    {
        Graphics.Blit(src, dest, CameraMainPostProcessMat);
    }
}

Basic PostProcess shader code

Shader "PostProcess/CameraMainPostProcess"
{
    Properties
    {
        [HideInInspector]_MainTex ("Texture", 2D) = "white" {}   
        _Tint("Tint", Color) = (1,1,1,1)               
    }
    SubShader
    {
        Cull Off 
        ZWrite Off 
        ZTest Always
    
        Pass
        {
            CGPROGRAM
            #pragma vertex vert
            #pragma fragment frag            


            #include "UnityCG.cginc"


            struct appdata
            {
                float4 vertex : POSITION;
                float2 uv : TEXCOORD0;              
            };


            struct v2f
            {                             
                float2 uv : TEXCOORD0;    
                float4 vertex : SV_POSITION;
            };
            
            sampler2D _MainTex;


            half4 _Tint;


            v2f vert (appdata v)
            {
                v2f o;
                o.vertex = UnityObjectToClipPos(v.vertex);    
                o.uv = v.uv;                      
                return o;
            }


            fixed4 frag (v2f i) : SV_Target
            {   
               //MAIN CAMERA FRAME TEXTURE
               float4 colMain = tex2D(_MainTex, i.uv);
               
               //APPLY CUSTOM TINT
               colMain *= _Tint;  
                        
               return colMain;
            }
            ENDCG
        }
    }
}
  • Assign newly created shader to material
  • Assign C# script to scene camera as new component
  • Assign material to recently added camera component
  • Tweak _Tint property of material to test PostProcess setup

Step 0: Final Result

***


Step 1: Brightness, Contrast, Vignette

***

Full Step 1 shader code update 

Shader "PostProcess/CameraMainPostProcess"
{
    Properties
    {
        [HideInInspector]_MainTex ("Texture", 2D) = "white" {}   
        _Tint("Tint", Color) = (1,1,1,1)
        _Contrast ("Contrast", float) = 1
        _Brightness ("Brightness", float) = 1
        _VignetteIntensity ("Vignette Intensity", Range(0,1)) = 0.5            
    }
    SubShader
    {
        Cull Off 
        ZWrite Off 
        ZTest Always
    
        Pass
        {
            CGPROGRAM
            #pragma vertex vert
            #pragma fragment frag            


            #include "UnityCG.cginc"


            struct appdata
            {
                float4 vertex : POSITION;
                float2 uv : TEXCOORD0;              
            };


            struct v2f
            {                             
                float2 uv : TEXCOORD0;    
                float4 vertex : SV_POSITION;
            };
            
            sampler2D _MainTex;


            half4 _Tint;
            
            half _Contrast;
            half _Brightness;


            half _VignetteIntensity;


            v2f vert (appdata v)
            {
                v2f o;
                o.vertex = UnityObjectToClipPos(v.vertex);    
                o.uv = v.uv;                      
                return o;
            }


            //CONTRAST METHOD
            half3 AdjustContrast(half3 color, half contrast) 
            {
                color = saturate(lerp(half3(0.5, 0.5, 0.5), color, contrast));
                return color;
            }  


            fixed4 frag (v2f i) : SV_Target
            {   
               //MAIN CAMERA FRAME TEXTURE
               float4 colMain = tex2D(_MainTex, i.uv);
               
               //CONTRAST
               colMain.rgb = AdjustContrast(colMain, _Contrast);                 
                
               //BRIGHTNESS
               colMain.rgb = pow(colMain, 1.0 / _Brightness); 
               
               //VIGNETTE
               half2 uvCoords = i.uv;          
               uvCoords = (uvCoords - 0.5) * 2.0;    
               half uvCoordsDot = dot (uvCoords,uvCoords);          
               half vignetteMask = 1.0 - uvCoordsDot * _VignetteIntensity;
               colMain *= vignetteMask; 
         
               //APPLY CUSTOM TINT
               colMain *= _Tint;  
                        
               return colMain;
            }
            ENDCG
        }
    }
}

Step 1: Final Result

***


Step 1.5: Adding variables to control Post Process shader properties from Unity inspector

***

C# PostProcess script update - custom variables 

using UnityEngine;


[ExecuteInEditMode]
public class PostProcess : MonoBehaviour
{
    public Material CameraMainPostProcessMat;


    public Color Tint;
    public float Brightness;
    public float Contrast;
    [Range(0,1)]public float VignetteIntensity;
    
    public void OnRenderImage(RenderTexture src, RenderTexture dest)
    {
        CameraMainPostProcessMat.SetColor("_Tint", Tint);
        CameraMainPostProcessMat.SetFloat("_Brightness", Brightness);
        CameraMainPostProcessMat.SetFloat("_Contrast", Contrast);
        CameraMainPostProcessMat.SetFloat("_VignetteIntensity", VignetteIntensity);
        
        Graphics.Blit(src, dest, CameraMainPostProcessMat);
    }
}
  • Now you are able to tweak PostProcess parameters of material through camera component


Step 2: Runtime gradient generation, 1D LUT Color Grading 

***

C# PostProcess script update - runtime LUT gradient & texture generation

using UnityEngine;


[ExecuteInEditMode]
public class PostProcess : MonoBehaviour
{
    public Material CameraMainPostProcessMat;


    public Color Tint;
    public float Brightness;
    public float Contrast;
    [Range(0,1)]public float VignetteIntensity;


    public bool IsGeneratingGradient;
    public Gradient LutGradient;
    public Vector2Int LutTextureSize;
    public Texture2D LutTexture;
    
    public void OnRenderImage(RenderTexture src, RenderTexture dest)
    {
        CameraMainPostProcessMat.SetColor("_Tint", Tint);
        CameraMainPostProcessMat.SetFloat("_Brightness", Brightness);
        CameraMainPostProcessMat.SetFloat("_Contrast", Contrast);
        CameraMainPostProcessMat.SetFloat("_VignetteIntensity", VignetteIntensity);


        if (IsGeneratingGradient)
            GenerateLuttexture();
            
        
        Graphics.Blit(src, dest, CameraMainPostProcessMat);
    }


    private void GenerateLuttexture()
    {
        LutTexture = new Texture2D (LutTextureSize.x, LutTextureSize.y);
        LutTexture.wrapMode = TextureWrapMode.Clamp;
      
        for (var x = 0; x < LutTextureSize.x; x++) {
            var color = LutGradient.Evaluate (x / (float) LutTextureSize.x);
            for (var y = 0; y < LutTextureSize.y; y++) {
                LutTexture.SetPixel(x,y,color);
            }
        }
      
        LutTexture.Apply();
    }
}

Full Step 2 shader code update 

Shader "PostProcess/CameraMainPostProcess"
{
    Properties
    {
        [HideInInspector]_MainTex ("Texture", 2D) = "white" {}   
        _Tint("Tint", Color) = (1,1,1,1)
        _LutColorGradeTex ("LUT Texture", 2D) = "white" {}
        _LutColorTransition ("LUT Color Transition", float) = 0
        _Brightness ("Brightness", float) = 1
        _Contrast ("Contrast", float) = 1       
        _VignetteIntensity ("Vignette Intensity", Range(0,1)) = 0.5           
    }
    SubShader
    {
        Cull Off 
        ZWrite Off 
        ZTest Always
    
        Pass
        {
            CGPROGRAM
            #pragma vertex vert
            #pragma fragment frag            


            #include "UnityCG.cginc"


            struct appdata
            {
                float4 vertex : POSITION;
                float2 uv : TEXCOORD0;              
            };


            struct v2f
            {                             
                float2 uv : TEXCOORD0;    
                float4 vertex : SV_POSITION;
            };
            
            sampler2D _MainTex;
            sampler2D _LutColorGradeTex;


            half4 _Tint;
            half _LutColorTransition;
            
            half _Contrast;
            half _Brightness;            
            half _VignetteIntensity;


            v2f vert (appdata v)
            {
                v2f o;
                o.vertex = UnityObjectToClipPos(v.vertex);    
                o.uv = v.uv;                      
                return o;
            }
            
            
            //CONTRAST METHOD
            half3 AdjustContrast(half3 color, half contrast) 
            {
                color = saturate(lerp(half3(0.5, 0.5, 0.5), color, contrast));
                return color;
            }  
      
            //COLOR GRADING LUT METHOD
            half4 ColorGrade(sampler2D colorGradeTex, half4 colMain)
            {
                half4 gradedColor = (0,0,0,1);
                gradedColor.r = tex2D(colorGradeTex, float2(colMain.x,0)).x;
                gradedColor.g = tex2D(colorGradeTex, float2(colMain.y,0)).y;
                gradedColor.b = tex2D(colorGradeTex, float2(colMain.z,0)).z;
          
                gradedColor = half4(lerp(colMain.rgb, gradedColor.rgb, _LutColorTransition), 1);
          
                return gradedColor;
            }           


            fixed4 frag (v2f i) : SV_Target
            {   
               //MAIN CAMERA FRAME TEXTURE
               float4 colMain = tex2D(_MainTex, i.uv);
               
               //BRIGHTNESS
               colMain.rgb = pow(colMain, 1.0 / _Brightness); 
               
               //CONTRAST
               colMain.rgb = AdjustContrast(colMain, _Contrast);  
               
               //VIGNETTE
               half2 uvCoords = i.uv;          
               uvCoords = (uvCoords - 0.5) * 2.0;    
               half uvCoordsDot = dot (uvCoords,uvCoords);          
               half vignetteMask = 1.0 - uvCoordsDot * _VignetteIntensity;
               colMain *= vignetteMask; 
               
               //APPLY CUSTOM TINT
               colMain *= _Tint;  
               
               //LUT COLOR GRADING
               half4 gradedColor = ColorGrade(_LutColorGradeTex, colMain);
               colMain.rgb = gradedColor.rgb; 
                        
               return colMain;
            }
            ENDCG
        }
    }
}

Step 2: Final result

***


And that’s about it. We have successfully implemeted some PostProcessing features for use with Unity built-in render pipeline.

Thanks for attention!


***

FOLLOW AND CHECK FOR UPDATES:

Decompiled Art YouTube

Decompiled Art Instagram

Decompiled Art Twitter

Decompiled Art Facebook


***