Hi and welcome to Decompiled Art articles!
This article is the third part of the Compute Shaders in Unity series. In this segment, we will delve into the potential of utilizing multiple kernels within a single shader. To provide a comprehensive understanding, we will review two examples that demonstrate the usage of multiple kernels. The first example involves performing per-pixel operations on a texture, while the second example showcases basic mathematical operations leveraging the capabilities of compute shaders. For the second example, we will explore a new entity - Compute Buffers.
It sounds incredibly exciting, if you ask me. Let's dive right in!
To follow along, make sure to check these chapters:
Compute Shaders in Unity: GPU Computing, First Compute Shader
Compute Shaders in Unity: Shader Core Elements, First Compute Shader Review
Multiple Kernels
In compute shaders, multiple kernels can be used to perform different computations or operations within a single compute shader program. To work with multiple kernels in a compute shader, each kernel should be defined as a separate function. Each kernel can have its own set of input and output variables, and it can perform specific computations or operations based on its defined functionality.
Using multiple kernels in compute shaders can be beneficial in scenarios where complex computations or different stages of a computation need to be performed in parallel, allowing for efficient GPU utilization and accelerated processing of large datasets.
Now, let's take a loot at a practical example of multiple kernels' usage.
Multiple Kernels (Texture-based example)
In one of the previous articles, we had a glimpse of what it's look like to work with textures generation and per-pixel calculation through compute shader processing. This time, we'll populate pixel data with values, that are calculated with multiple kernels' usage.
To start off, prepare some basic setup to visualize compute shader's output results.
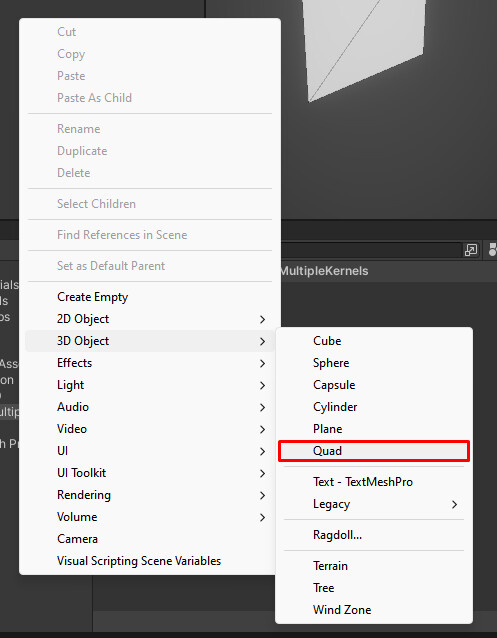
Create a quad gameObject with assigned default Unlit material.
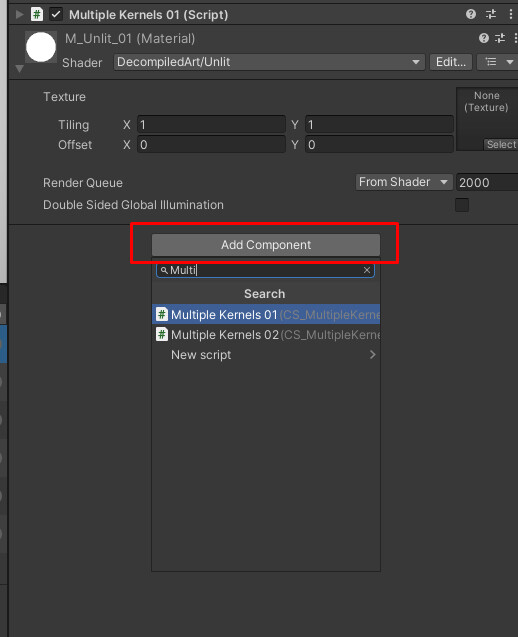
To get started, create a new .compute shader asset and a new C# script. Copy/paste the following code into the respective files and add C# script as a new component for a newly added quad gameObject.
Now we can proceed with reviewing of .compute & C# script usage.
Compute shader (named CS_MultipleKernels_01) code:
#pragma kernel TintBlue
#pragma kernel TintYellow

RWTexture2D<float4> Result;

uniform float4 tint01;
uniform float4 tint02;

[numthreads(8,8,1)]
void TintBlue (uint3 id : SV_DispatchThreadID)
{
    Result[id.xy] = tint01;
}

[numthreads(8,8,1)]
void TintYellow (uint3 id : SV_DispatchThreadID)
{
    Result[id.xy] = tint02;
}
Color tint values
uniform float4 tint01;
uniform float4 tint02;
properties to store color (float4) data.
Kernels
[numthreads(8,8,1)]
void TintBlue (uint3 id : SV_DispatchThreadID)
{
    Result[id.xy] = tint01;
}

[numthreads(8,8,1)]
void TintYellow (uint3 id : SV_DispatchThreadID)
{
    Result[id.xy] = tint02;
}
Kernels generate per-pixel values based on the tint01 and tint02 parameters.
C# script (named MultipleKernels01) code
public class MultipleKernels01 : MonoBehaviour
{
    [SerializeField] private ComputeShader computeShader;
    [SerializeField] private KernelData[] kernelsData;
    [SerializeField] private int textureResolution = 128;

    private RenderTexture _renderTexture;
    private int[] _kernelsHandles;

    private Renderer _renderer;
    private static readonly int MainTex = Shader.PropertyToID("_MainTex");

    private void Start()
    {
        //GET RENDERER COMPONENT REFERENCE
        TryGetComponent(out _renderer);

        //CREATE NEW RENDER TEXTURE TO RENDER DATA TO
        _renderTexture = new RenderTexture(textureResolution, textureResolution, 0)
        {
            enableRandomWrite = true
        };
        _renderTexture.Create();

        if(kernelsData.Length < 1) return;

        _kernelsHandles = new int[kernelsData.Length];
        computeShader.SetInt("textureResolution", textureResolution);

        for (var i = 0; i < kernelsData.Length; i++)
        {
            var kernelName = kernelsData[i].name;

            _kernelsHandles[i] = computeShader.FindKernel(kernelName);

            computeShader.SetTexture(_kernelsHandles[i], "result", _renderTexture);
            computeShader.SetVector(kernelsData[i].shaderTintPropertyName, kernelsData[i].tint);

            computeShader.Dispatch(_kernelsHandles[i], textureResolution/kernelsData[i].dispatchDividers.x,
                textureResolution/kernelsData[i].dispatchDividers.y, 1);
        }

        _renderer.sharedMaterial.SetTexture(MainTex, _renderTexture);
    }

    private void OnDisable()
    {
        if (_renderTexture != null)
            Destroy(_renderTexture);

        _renderer.sharedMaterial.SetTexture(MainTex, null);
    }

    [Serializable]
    private struct KernelData
    {
        public string name;
        public string shaderTintPropertyName;
        public Color tint;
        public int2 dispatchDividers;
    }
}
Since we have already reviewed the majority of the C# script code lines in one of the previous articles, let's focus on the distinctive aspects specific to this particular article.
Multiple kernels processing
for (var i = 0; i < kernelsData.Length; i++)
{
    var kernelName = kernelsData[i].name;

    //COMPUTE SHADER & RESULTING RENDERTEXTURE SETUP
    _kernelsHandles[i] = computeShader.FindKernel(kernelName);

    computeShader.SetTexture(_kernelsHandles[i], "result", _renderTexture);
    computeShader.SetVector(kernelsData[i].shaderTintPropertyName, kernelsData[i].tint);

    computeShader.Dispatch(_kernelsHandles[i], textureResolution/kernelsData[i].dispatchDividers.x,
        textureResolution/kernelsData[i].dispatchDividers.y, 1);
}
To simplify the process, a for loop is utilized to handle all kernels and their associated data (with SetTexture() and SetVector() methods). To determine which portion of the texture's pixels should be populated by the output of a specific kernel (RWTexture2D Result), you have the flexibility to specify a custom number of thread groups for each coordinate (X, Y, Z).
Coordinate X = textureResolution/kernelsData[i].dispatchDividers.x.
Coordinate Y = textureResolution/kernelsData[i].dispatchDividers.y.
Coordinate Z = 1.
Two coordinates values required to correctly process per-pixel data as texture itself is represents by X,Y coordinates (values for them are set with textureResolution). dispatchDividers are specified through KernelData.
KernelData struct
[Serializable]
private struct KernelData
{
    public string name;
    public string shaderTintPropertyName;
    public Color tint;
    public int2 dispatchDividers;
}
Struct is used to define different elements for configuring compute shader kernels. It needs to be serialized so that we can easily view and modify its values.

Let's test the result of texture's per-pixel processing.
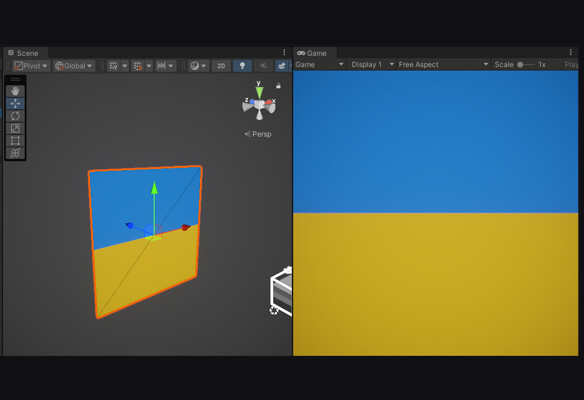
By setting custom values for the dispatchDividers, we have the ability to control the number of pixels processed by a specific kernel. This allows us to adjust the amount of work performed by the kernel on a per-pixel basis.
With that, we have completed the first example showcasing the usage of multiple kernels for per-pixel processing of a texture. In the next example, we will delve into another component that requires examination: the Compute Buffer.
Compute Buffers
When working with compute shaders, Compute Buffers are a type of data structure that allow efficient data communication between the CPU and GPU. They serve as a bridge for transferring data, enabling parallel processing on the GPU, designed to store large amounts of structured data (such as arrays of elements or structs).
Compute Buffers have a defined size, which determines the maximum number of elements they can hold. Each element within the buffer has a specific stride, representing the size in bytes of that element. The stride is used to calculate memory offsets and determine the layout of the buffer's data.
These buffers are particularly useful for scenarios involving large-scale computations, simulations, or data processing tasks. They facilitate efficient data transfer and parallel processing, leveraging the computational power of the GPU to accelerate performance.
CPU-GPU data transfer with Compute Buffers

Multiple Kernels (Calculations-based example)
Now, as we've scratched the surface of what Compute Buffers are, we'll take a loot at how compute shaders could be used to process simple calculation with provided data.
The practical objective of this example is to transfer data from the CPU to the GPU, perform calculations, receive the results, and output them using Debug.Log() for logging purposes. During this process, RWStructuredBuffer type of Compute Buffer will be used.
RWStructuredBuffer is a type of read-write buffer that provides read and write access to structured data from within a compute shader kernel. This buffer can hold elements of a specific structure or data type. Each element in the buffer can contain multiple data fields, such as floats, integers, vectors, or custom data structures.
(Just like earlier) create a new .compute asset and related C# script. Follow the same process of adding a new component to existing quad gameObject.
Compute shader (named CS_MultipleKernels_02) code:
#pragma kernel Kernel01
#pragma kernel Kernel02

RWStructuredBuffer<int> intBuffer;
int intValue;

[numthreads(8,1,1)]
void Kernel01 (uint3 id : SV_DispatchThreadID)
{
    intBuffer[id.x] = id.x * intValue;
}

[numthreads(8,1,1)]
void Kernel02 (uint3 id : SV_DispatchThreadID)
{
    intBuffer[id.x] += 1;
}
Kernel01 set up
[numthreads(8,1,1)]
void Kernel01 (uint3 id : SV_DispatchThreadID)
{
    intBuffer[id.x] = id.x * intValue;
}
Kernel01 computes the multiplication result of id.x and intValue (which is set from the C# script).
Kernel02 set up
[numthreads(8,1,1)]
void Kernel02 (uint3 id : SV_DispatchThreadID)
{
    intBuffer[id.x] += 1;
}
Kernel01 computes the sum result of id.x and intValue (which is set from the C# script).
C# script (named MultipleKernels02) code
public class MultipleKernels02 : MonoBehaviour
{
    [SerializeField] private ComputeShader computeShader;
    [Range(1,8)][SerializeField] private int computeBufferSize = 4;
    [SerializeField] private int intValue;
    [SerializeField] private string kernel01Name;
    [SerializeField] private string kernel02Name;

    private int _kernelsHandle01;
    private int _kernelsHandle02;

    private ComputeBuffer _computeBuffer;

    private void Start()
    {
        if(!computeShader) return;

        #region PROCESS_KERNEL01
        //KERNELS SET UP
        _kernelsHandle01 = computeShader.FindKernel(kernel01Name);
        _kernelsHandle02 = computeShader.FindKernel(kernel02Name);

        //ARGUMENTS: SIZE OF THE AREA TO BE SAVED, SIZE PER UNIT OF DATA TO BE SAVED
        _computeBuffer = new ComputeBuffer(computeBufferSize, sizeof(int));

        computeShader.SetBuffer(_kernelsHandle01,"intBuffer", _computeBuffer);
        computeShader.SetInt("intValue", intValue);
        computeShader.Dispatch(_kernelsHandle01, 1,1,1);

        int[] result = new int[computeBufferSize];
        _computeBuffer.GetData(result);

        for (var i = 0; i < computeBufferSize; i++)
        {
            Debug.Log("Kernel01 Processing: " + result[i]);
        }

        #endregion

        #region PROCESS_KERNEL02

        computeShader.SetBuffer(_kernelsHandle02,"intBuffer", _computeBuffer);
        computeShader.Dispatch(_kernelsHandle02, 1,1,1);

        _computeBuffer.GetData(result);

        for (var i = 0; i < computeBufferSize; i++)
        {
            Debug.Log("Kernel02 Processing: " + result[i]);
        }

        #endregion
    }

    private void OnDestroy()
    {
        _computeBuffer.Release();
    }
}
Creating new ComputeBuffer
_computeBuffer = new ComputeBuffer(computeBufferSize, sizeof(int));
ComputeBuffer(int count, int stride) constructor is used to create a ComputeBuffer object, which serves as a buffer for storing data that can be accessed and manipulated by compute shaders.
• count specifies the number of elements or data points that the buffer can store. This value indicates the size of the buffer.
• stride represents the size in bytes of each individual element in the buffer. It determines the spacing between elements in the buffer and is used to calculate memory offsets.
Once you have created a ComputeBuffer, you can set and get data to and from it using various methods provided by the class, such as SetData() and GetData(). These methods allow you to transfer data between the CPU and GPU.
Passing ComputeBuffer to Compute Shader:
computeShader.SetBuffer(_kernelsHandle01,"intBuffer", _computeBuffer);
SetBuffer() method is used to bind a ComputeBuffer to a shader for use in a compute shader. It establishes a connection between a ComputeBuffer and a shader, allowing the shader to read from or write to the data stored in the ComputeBuffer.
Compute Shader Dispatch/Execute
computeShader.Dispatch(_kernelsHandle01, 1,1,1);
It's important to note that in this case, we are passing a single thread group for each value in the three-dimensional array (1 for X, Y, and Z, respectively). Since we are working with a simple data set that is involved in the calculations, we only need to specify a single threads group (X coordinate) for the computation.
We also specifying the max amount of output results by settings computeBufferSize. But output length can not exceed of maximum threads set within compute shader (currently set to numthreads(8,1,1)).
_computeBuffer = new ComputeBuffer(computeBufferSize, sizeof(int));
As a reminder, in order to calculate the total number of threads involved, we need to multiply the values of each thread group. Therefore, we assign a value of 1 to Y and Z by default, ensuring that the multiplication produces the correct output.
Get Compute Shader calculation results:
int[] result = new int[computeBufferSize];
_computeBuffer.GetData(result);
Get compute shader's calculation results with GetData() method and pass that data into an output array of integers (allocated earlier).
Clear ComputeBuffer
_computeBuffer.Release();
After using a ComputeBuffer, it's important to release its resources by calling the Release() method to avoid memory leaks.
Turn on Play mode and check console for expected compute shader's output.
Component fields' values and Log output result

Based on the specified computeBufferSize, you should obtain a corresponding number of output results. Congratulations! You've now succesfully processed data through CPU-GPU compute pipeline.
And that concludes the article and hopefully enhances your understanding of working with Compute Shaders in Unity.
Thanks a lot for attention, and until the next time!
Support Decompiled Art on Patreon
(and get source files for this article)

Support Decompiled Art with Ko-fi

***
FOLLOW AND CHECK FOR UPDATES:
Decompiled Art YouTube
Decompiled Art Instagram
Decompiled Art Twitter
Decompiled Art Facebook
***